Techniques
Liquid Culture Recipe: What to Mix and How to Sterilize It
Published August 2, 2026 · By MushroomGrowLab
Contents
A liquid culture recipe is four ingredients and a pressure cooker. The part that decides whether it works is the sterilization time, and it’s the number most often reported wrong.
This guide gives the recipe as published, the timings with their sources attached, and an honest split between the figures that come from measurement and the ones that are craft practice passed between growers. Both are useful. They just shouldn’t be presented as the same thing.
What liquid culture actually is#
Liquid culture is mycelium grown in a sterilized nutrient broth. It sits between your culture, whether that’s an agar plate, a slant, or a spore-derived isolate, and the grain jars you want to fill. One flask inoculates a lot of jars, and it does it faster than transferring grain to grain.
Pleurotus ostreatus mycelium advances about 14 mm a day from liquid spawn against 8.6 mm from wheat grain, per a 2026 systematic review in Agronomy. That review rests on three studies and one of them found no difference in yield or cropping time, so treat it as a real advantage with thin backing rather than a settled figure.
One thing worth clearing up before you mix anything. Two different techniques go by the name “liquid culture.” In some cultivation books it means colonized material blended into plain sterile water with no nutrients at all, which disperses inoculum rather than growing it. This guide covers the nutrient broth. If you’ve seen a “recipe” that was just water and a blender, that’s why.
Scaling past a few flasks becomes a different problem involving aerated carboys and a sterile room. Our spawn overview covers where liquid spawn sits in commercial production.
What you’ll need#
- A flask or wide-mouth jar. Erlenmeyer flasks are the standard because the shape lets you swirl without sloshing. Fill to about half capacity, which leaves the headspace the broth needs for gas exchange.
- A magnetic stir bar and stir plate. Drop the bar in before sterilizing. This is the piece that does the real work, and there’s a reason for it further down.
- A pressure cooker that holds 15 PSI. Nothing about this recipe works without one.
- A still air box or flow hood for the inoculation itself.
- Light malt extract, plus yeast, calcium sulfate, and a little hardwood sawdust if you’re following the published formula.
- A closure. A lid with a filter patch and a self-healing injection port is the one to get, because it lets you inoculate and draw from the flask without ever opening it. Nonabsorbent cotton packed into the neck under a foil cap does the same job for nothing if you’d rather not buy lids.
The 0.22 µm figure attached to those filters deserves a caveat. It’s a real standard, but it comes from a different job: the FDA defines it as a sterilizing rating for filtering liquids, validated against an organism about 0.3 µm across. No published standard sets a micron rating for gas exchange through a jar lid, and what you’re keeping out of the flask is bacteria at 3 to 5 µm and fungal spores at 5 to 30 µm, one to two orders of magnitude larger. A 0.22 µm filter will certainly do the job. You’re just not buying the protection the number implies.
Spawn and cultures to start from are available through North Spore, Out-Grow, and Fungi Ally, among others.
The liquid culture recipe#
This is the formula from Paul Stamets’ Growing Gourmet and Medicinal Mushrooms, given as printed. It’s labelled for wood decomposers, which covers most of what home growers cultivate.
Some links in this guide are affiliate links: if you buy through them we may earn a small commission, at no extra cost to you.
| Ingredient | Per litre |
|---|---|
| Water | 1,000 ml |
| Barley malt sugar | 40 g |
| Hardwood sawdust | 3–5 g |
| Yeast | 2 g |
| Calcium sulfate | 1 g |
Forty grams per litre is 4% by weight. Two things about the result surprise people the first time. The ingredients don’t dissolve, and the pH lands between 6.0 and 6.5 on its own if you start with near-neutral water.
The sawdust is the unusual entry. It gives the mycelium a preview of the substrate it will meet later, which Stamets credits with shortening the lag period once the culture hits a wood-based bulk. It also explains the long sterilization time and the cloudy appearance further down.
Most hobby recipes are simpler than this, and you’ll see them everywhere: malt extract in water at roughly the same 4%, with no sawdust and no calcium sulfate. That works. What you give up is the lag-period head start, and a sterilization time you can point at, since the 1-to-2-hour figure below was published for the fuller medium.
The book varies its own recipe by species, so treat the table as a starting point rather than a constant. A shiitake version runs at roughly half strength, and the sawdust quantity moves between 1 and 5 grams depending on where in the book you look.
Which sugar to use#
Light malt extract is the default recommendation almost everywhere, and the evidence for it is thinner than its reputation suggests.
A 2021 study in Scientific Papers Series B, Horticulture tested six liquid media across ten edible and medicinal species. Malt extract broth was the best medium for none of them. Potato dextrose took several and yeast-malt took others, though the paper’s own data complicates that. Wet and dry biomass don’t track each other, and Ganoderma applanatum topped the wet-weight ranking on potato dextrose while yielding more dry mycelium on yeast-malt. So it doesn’t cleanly crown a replacement either.
What it does establish is that the case for malt isn’t colonization speed. It’s composition. USDA data puts malt syrup at 6.2 g of protein and 236 mg of phosphorus per 100 g, against honey’s 0.3 g and 4 mg, and dextrose is refined glucose with neither. Malt brings nitrogen and minerals to the flask; the pure sugars bring energy and nothing else.
Glucose came out the best all-round carbon source in a separate 2021 review by Krupodorova and colleagues covering 113 basidiomycetes, but even there the pattern is strain-specific. Five shiitake studies within that review picked four different sugars.
No study compares honey against malt or dextrose for mushroom mycelium, so anyone telling you it’s better or worse is going past the evidence. Its antibacterial reputation doesn’t survive the process: the osmotic effect needs honey near full strength, and the peroxide mechanism degrades between 113 and 149°F (45–65°C). At 4% in an autoclaved broth it’s a sugar source like any other.
How much sugar, and why the usual warning is overstated#
Four percent works. The warning that usually accompanies it, that going higher stresses the mycelium through osmotic pressure, turns out to be poorly supported once you read the studies it points at.
- In submerged culture, Ganoderma applanatum was tested across a glucose series from 1% to 8%. Biomass was highest at 8%, the top of the range tested. The curve never turned over, because the experiment stopped before it could.
- On agar, Pleurotus ostreatus and P. cystidiosus showed no further gain in colony diameter above 5% and 3% sucrose. The paper’s wording is that higher concentrations were “unable to increase” growth, which describes a plateau, and the osmotic explanation offered alongside it is the authors’ interpretation rather than something they measured.
- The one clean interior optimum comes from a response-surface study on Ganoderma lucidum: peak biomass at 26.5 g/L of glucose, roughly 2.65%, falling off on both sides.
The published numbers point in different directions depending on species and method, so 4% is best read as a practical working concentration rather than a physiological ceiling. Hobby recipes sit below every documented plateau anyway.
The nutrient that does show a measured decline from oversupply is nitrogen. Work on oyster mycelium found growth decreasing above roughly 0.05 to 0.09% ammonium chloride. Hitting the sugar concentration exactly is not what separates a working culture from a failed one.
Making the culture step by step#
- Mix the dry ingredients into the water. They won’t dissolve fully and aren’t supposed to. Drop in the stir bar now, before anything goes near the pressure cooker.
- Fill your vessel to about half its capacity. 750 ml in a 1,500 ml flask. Stuff the opening with nonabsorbent cotton and cover with foil, or fit a filter-patch lid.
- Sterilize at 15 PSI for 1 to 2 hours. This number is worth tracing, because the book it comes from is easy to misread. Growing Gourmet discusses sterilization in its media chapter, names 15 to 20 minutes as the conventional figure for liquid media, calls that “far too brief,” and then gives its corrected time for agars. The liquid figure never appears in that chapter. It’s in the liquid culture procedure itself, and it reads: “sterilized for 1 to 2 hours at 15 psi.” Anything in the 15-to-45-minute range attributed to this book is the agar number.
- Let the cooker cool on its own. If yours doesn’t pull a vacuum as it cools, take the vessels out at 1 to 2 PSI rather than waiting for atmospheric pressure. A cooker equalising through a gap draws contaminated air across your flask.
- Wait until the broth is below 86°F (30°C) before inoculating. Nothing published names that number. Thermal death limits for mushroom mycelium start at about 90°F (32°C) for king stropharia and run up to 106°F (41°C) for other species, so 86°F sits under the lowest of them with room to spare. It’s the temperature at which a jar feels barely warm against the back of your hand, which is the point of picking it.
- Inoculate in front of a flow hood or inside a still air box. A wedge of colonized agar, a slice off a slant, or a few millilitres from an existing culture all work.
- Stir continuously at 100 to 200 rpm for 48 to 72 hours. That’s a duration of continuous stirring, not an interval between shakes. Published shake-flask work clusters a little lower, at 100 to 150 rpm. Without a stir plate, hand-swirling several times a day is a workable compromise, and it is a compromise.
- Hold it around 77°F (25°C). Anywhere from 68 to 86°F (20–30°C) works. Expect the broth to acidify over the run, drifting down toward pH 4 from the 6.0 to 6.5 it started at.
Why the stirring matters more than it looks: shear breaks the mycelium into fragments, and every fragment becomes a fresh growing point. Work on Inonotus hispidus measured dispersed fragments against clumps at 10.43 g/L versus 5.29 g/L of biomass, with a shorter lag phase on top. A stirred culture doesn’t just grow more, it colonizes grain faster afterwards, because you’re pouring in thousands of starting points instead of one lump.
Knowing when it’s ready#
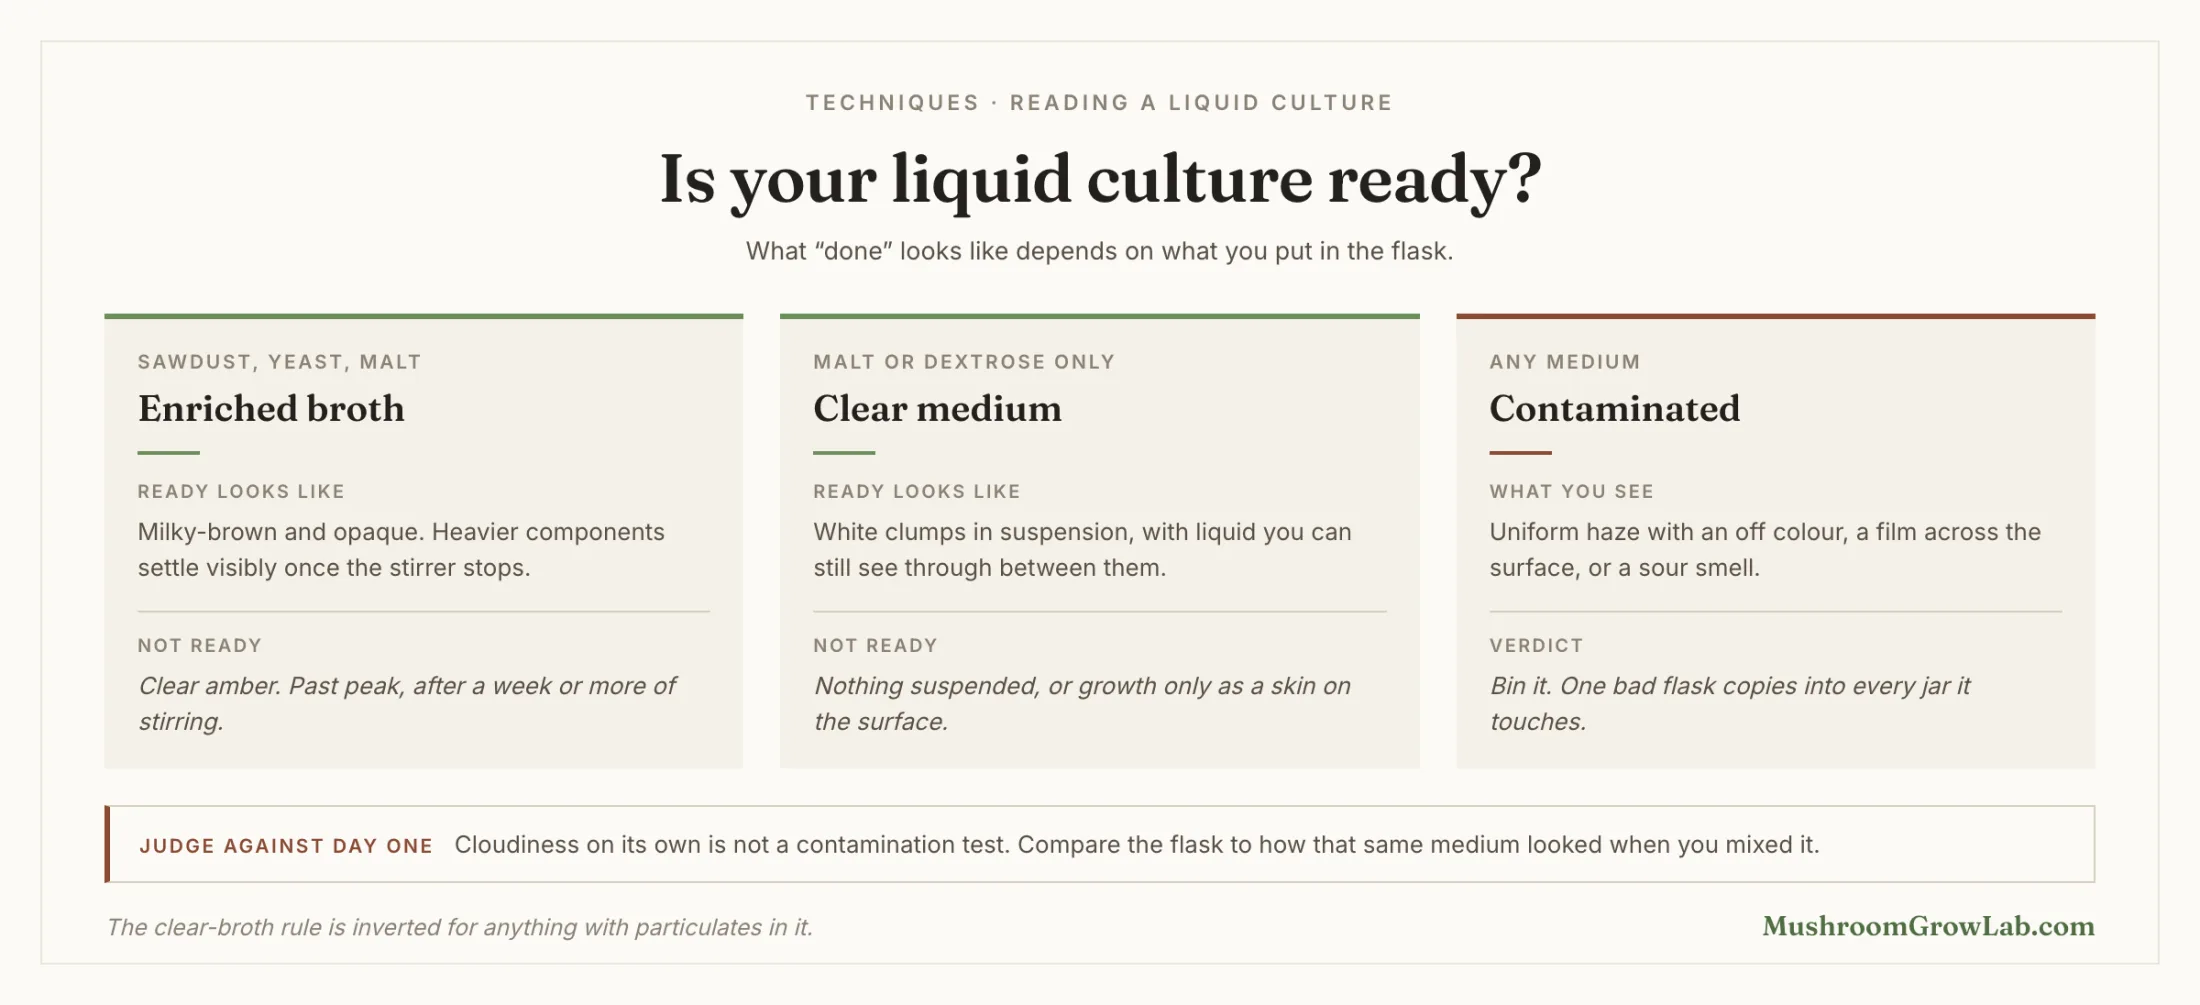
The common rule says a finished liquid culture is clear amber with white clouds suspended in it, and that cloudiness means bacteria. In the recipe above, that’s wrong in both directions. Stamets describes his own culture at the ready-to-use stage as having “a milkybrown color” that “is not translucent,” with visible settling when you stop the stirrer. Clear amber shows up only after the flask has run for more than a week, once the colonies coalesce into a mat, and that’s past the point you wanted it.
The test has to be scoped to what’s in the flask:
- Enriched or particulate broth, anything with sawdust or yeast in it, is opaque and milky by design. Clarity is a late-stage signal, not a health check.
- Clear media, malt or dextrose alone with nothing to cloud them, should show white clumps suspended in liquid you can see through.
- In neither case is cloudiness by itself a contamination test. What you’re looking for is uniform turbidity with an off colour, a film or skin across the surface, or a sour smell, judged against what that particular medium looks like clean.
Those clumps have a name and a size. Stamets reports hyphal balls averaging under 2 mm across at somewhere between 1,000 and 3,500 per millilitre, peaking between 2 and 14 days depending on species.
How much you’ll need per jar#
Four sources give four figures, from four different contexts. They’re close enough to be useful and different enough that averaging them would invent a number none of them support.
| Rate | Source |
|---|---|
| 15 ml per 250 g of grain | Yang and Jong, via Stamets |
| 30–50 ml per 500–600 g of grain | Stamets’ own practice |
| 10 ml per quart jar | Cotter, Organic Mushroom Farming |
| 2–4% by volume | Submerged culture studies |
For planning, Stamets works three one-litre flasks through 100 half-gallon jars at 30 ml a time, which comes to roughly 33 jars per litre. That’s the number to budget against.
Getting the grain itself right is a separate job with its own hydration targets and sterilization times, and it’s where most first attempts actually fail. We’re covering it separately.
Tips and common mistakes#
Err long on sterilizing, never short. A broth of sugar, sawdust and yeast grows contaminants just as well as it grows mycelium. The 1-to-2-hour figure is for that full recipe, and nobody has published a time for a plain malt-and-water broth, so don’t assume the simpler version needs less.
Inoculating into hot broth kills the culture outright. An easy mistake at the end of a long session. Cooling overnight removes the temptation.
Skipping agitation gives up the whole advantage. An unstirred flask grows a mat on still liquid, so you end up transferring one clump instead of thousands of growing points.
Never inoculate a full grain run from a culture you haven’t inspected. One contaminated flask copies itself into every jar it touches, and you won’t find out until a week of incubation is gone.
On shelf life, nobody has measured it. The two-to-six-month figure in circulation has no published basis for mycelium in refrigerated broth. Penn State’s storage guidance gives agar cultures about four months at 39°F (4°C) and grain spawn up to six, and cold slows metabolism roughly sevenfold without stopping it. Use a culture soon after it peaks and the question doesn’t arise.
Related guides#
- Mushroom spawn: types, how to choose, and what it costs — where liquid spawn sits among the alternatives
- How to make mushroom spawn from spores — getting the culture you’ll expand here
- Mushroom substrate: recipes, materials, and how to pick one — what the spawn goes into next
- Substrate calculator — amounts for the bulk stage
- Oyster, shiitake, reishi, and lion’s mane — species-specific quirks worth checking before you scale a culture up
Newsletter
Grow better mushrooms